In the fast-paced world of social media, maintaining a vibrant and engaging presence on platforms like Instagram is essential for individuals and businesses alike. However, manually sharing photos and managing posts can be time-consuming and often overwhelming. Enter n8n, an innovative open-source automation tool that empowers users to streamline their workflows and connect various applications effortlessly.
In this blog post, we will delve into how to use n8n to share photos on Instagram, enabling you to automate your posting process and focus more on creating captivating content.
Whether you’re a content creator, a marketer, or simply looking to enhance your Instagram game, this guide will provide you with the insights and steps needed to make your photo-sharing experience efficient and effective.
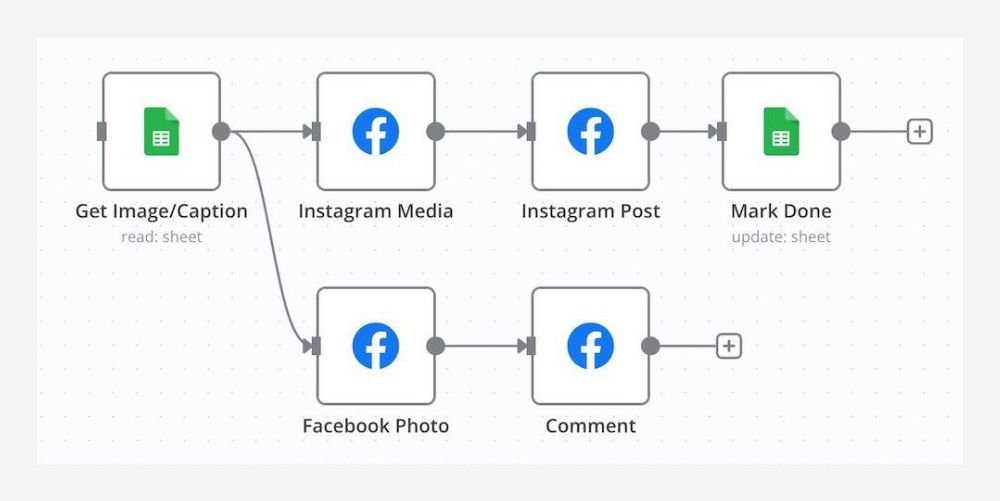
Here’s an example of an n8n workflow that gets a row from a sheet and posts the image and caption to Instagram and Facebook. We’re going to focus on Instagram only in this guide.
What You’ll Need
Ensure you have a Permanent Facebook Open Graph access token.
Get your Instagram user ID by going to Business Portfolio > Accounts > Instagram accounts
Link: https://business.facebook.com/latest/settings/instagram_account
Ensure your Instagram page is linked to a Business Portfolio.
Posting Instagram Photos using n8n
Instagram API posting works in 2 steps. First, you must upload the media to Facebook servers and then you send a request to post the image.
I’ll walk you through the process step by step.
Prepare Your Images and Captions
Populate a Google Sheets or Airtable Base with 3 columns: Image URL, Caption, and a “Shared” column to ensure you don’t post the same image twice.
Add the Sheets node
Add the Sheets node to your n8n Workflow. Choose the Operation “Get Rows”. Add a Filter to search for the “Shared” column as empty. Finally, under “Options” add the option to “Return only First Matching Row” and turn it on to green.
Connect a Facebook Graph API node
Next, connect a “Facebook Graph API” node. I like to change the name to “Instagram Media” so I know what the node does.
Edit the Node Parameters:
Credential to connect with – Add your Facebook access token here if you haven’t already.
Host URL – Default
HTTP Request Method – POST
Graph API Version – v21.0
Node – Input your Instagram ID here.
Edge – media
Options
Query Parameters
Name – image_url
Value – {{ $json[‘Image URL’] }}
Name – caption
Value – {{ $json.Caption }}
Connect another Facebook Graph API node
Next, connect another “Facebook Graph API” node. Change the name to “Instagram Post” so you know what the node does.
Edit the Node Parameters:
Credential to connect with – Select your Facebook credential.
Host URL – Default
HTTP Request Method – POST
Graph API Version – v21.0
Node – Input your Instagram ID here.
Edge – media_publish
Options
Query Parameters
Name – creation_id
Value – {{ $json.id }}
Be sure to pull in the $json.id from the “INPUT” Schema section of the previous node.
This is the node that will actually share the Instagram post! WooHoo!
Mark the row Done in Sheets
Finally, add a Sheets node. Find the same document and add an Operation to “Update Row.” Choose row_number as the “Column to match on.” Under “Values to Update” add your “Shared” column and write in the value as “true.”
This will ensure the next time you run the Workflow, a new row is selected that has not yet been shared.