Let’s talk about how to automate image formatting on your WordPress blog. Do you find yourself constantly adjusting the default image size, alignment when you upload your photos to WordPress? Maybe you’re always typing out the Image Title, Alt Text and Description manually?
I’ve got good news for you! There’s an easy way to automate many of the tedious tasks you’re doing right now to prep your images for your blog, including automatically re-sizing them so they’re not massive!
Keep reading for three awesome hacks to automate image formatting on your blog, all of which I use in some capacity!
These simple pieces of advice will save you TONS of time, especially if you manage a photo-heavy blog like I do!
1. How to Set the Default Image Size and Alignment in WordPress
Head to : yourblog.com/wp-admin/options.php
This page contains a secret list of WordPress options relating to your blog! Do search for the word “align” on this webpage. There you’ll see the first of three image options:
image_default_align
image_default_link_type
image_default_size
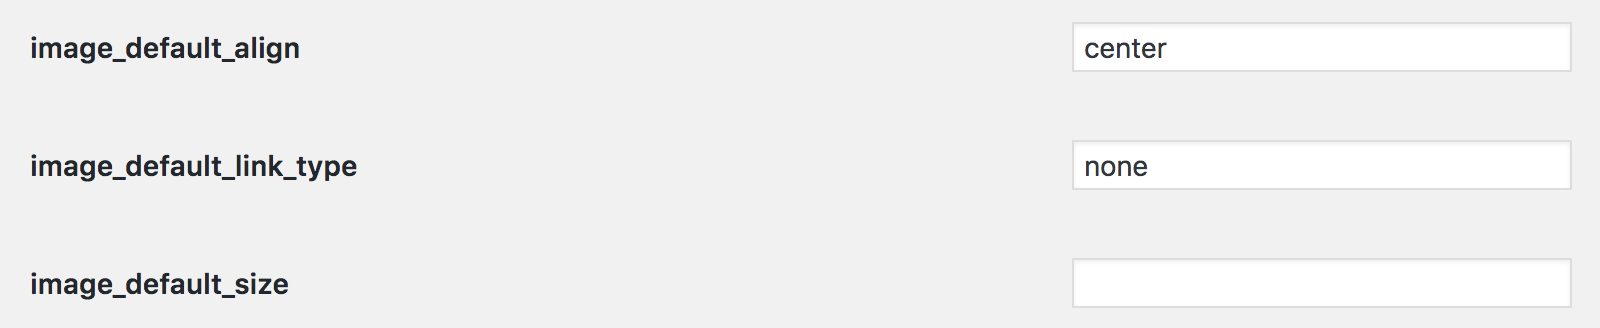
The first option (image_default_align) tells WordPress how to align your images. You can enter the following words in this field depending on how you want your images aligned: left, right, center, or none
The second option (image_default_link_type) sets the WordPress default link type for each image you upload. You can enter file or none, depending on whether you want your image to be linked to the file itself (good to allow your users to zoom in), or to have no link by default.
The last option (image_default_size) lets you set the default image size for your WordPress images. You can choose from thumbnail, medium, or large.
When you’ve got the settings you like, then scroll down to the very bottom and click “Save Changes.”
2. How to Make Image Filenames Serve as Alt Text, Title and Description in WordPress
It’s good SEO practice to name your image files with words that help describe them! So if you’re writing about Rome, you might have a photo of the Colosseum that you would name something like: “Visiting the Colosseum in Rome” so when people search for that term, your image has a chance of appearing.
If you want that image file name to automatically appear in WordPress as the Title, Alt Text, Caption, and Description, then head to your theme’s functions.php file and add the following code!
This code also “cleans up” the image file name by removing any additional characters like hyphens, and capitalizing the first letter of each word!
You can easily comment out any part of this code if you don’t want the Caption portion to be filled automatically, for example. Just add two slashes before that section : //
2
3
4
5
6
7
8
9
10
11
12
13
14
15
16
17
18
19
20
21
22
23
24
25
26
27
28
29
30
31
--------------------------------------------------------------------------------------*/
add_action( 'add_attachment', 'my_set_image_meta_upon_image_upload' );
function my_set_image_meta_upon_image_upload( $post_ID ) {
if ( wp_attachment_is_image( $post_ID ) ) {
$my_image_title = get_post( $post_ID )->post_title;
// Clean up the title: remove hyphens, underscores & extra spaces:
$my_image_title = preg_replace( '%\s*[-_\s]+\s*%', ' ', $my_image_title );
// Clean up the title: capitalize first letter of every word (other letters lower case):
$my_image_title = ucwords( strtolower( $my_image_title ) );
// Image meta (Title, Caption, Description) to be updated
// Comment out the Excerpt/Caption or Content/Description lines if not needed
$my_image_meta = array(
'ID' => $post_ID, // Specify the image (ID) to be updated
'post_title' => $my_image_title, // Set image Title to sanitized title
'post_excerpt' => $my_image_title, // Set image Caption (Excerpt) to sanitized title
'post_content' => $my_image_title, // Set image Description (Content) to sanitized title
);
// Set the image Alt-Text
update_post_meta( $post_ID, '_wp_attachment_image_alt', $my_image_title );
// Set the image meta (e.g. Title, Excerpt, Content)
wp_update_post( $my_image_meta );
}
}
3. How to Auto Re-Size Uploaded Images
My last tip is great for photographers who shoot with a DSLR and use large files for their blog. It’s a best practice to shrink the size of your image files before uploading them, so they don’t take too long to load when a user visits your site.
I always shrink my image size before uploading, but sometimes I get so excited about publishing a certain post that I forget! The Smush Image Compression and Optimization plugin saves the day in these cases, by automatically shrinking any photos that are larger than a specific size (2MB in my case!)
You should always aim to upload image files to your website that are smaller than 500 MB unless you’re a photographer and need high-resolution images on your site for business purposes.
Having massive images on a website slows down the site’s load time, thus results in a poor user experience. Studies have shown that if a site takes longer than a few seconds to load, users will simply give up and abandon the site altogether!
Using a plugin like Smush can save you time spent downsizing your images manually by doing it automatically for you upon upload to your site!
I hope you found these WordPress image hacks useful. What have you done to speed up your process when working with blog images?
Greetings. I’ve followed the steps in part 1, successfully changing the defaults for link type and size, but i’m finding that changing the alignment to “right” isn’t working.
On the options page i have set that field to “right” (i even tried “alignright”) but it isn’t being applied. have you noticed this before, or spotted an answer elsewhere to what might be over-riding this option field?
Hi! I haven’t had that problem, but I believe that in Gutenberg, WordPress now “remembers” the last alignment you chose and applies that to future uploads.