Most people know how to add one link to an entire image, but did you know there’s a way to selectively add multiple links to certain areas of your image? Adding multiple links to different parts of an image is very useful for product round-ups, and linking directly to items in photos. It’s super easy and quick to do online using HTML and doesn’t require any coding knowledge.
Personally, I started to research this capability because I wanted to use a combination of RewardStyle links and my own Amazon links in the same product round-up post. The “Money Spot” widget by RewardStyle only allows you to link to products on their platform and I used that widget for a while, but after I ran into some trouble with their “Boutique” widget disappearing from my posts, I started to move away from using RewardStyle widgets and host the images on my blog directly.
Creating the links on your own is way better for several reasons: you have control over the image, the links, everything. If you want to change or update a link, it’s super easy to do without going through RewardStyle. If RewardStyle servers go down temporarily, then so do your images. Maybe you want to link to a product that isn’t featured on RewardStyle, or you want to link using a different affiliate network (like me with Amazon). In all of these cases creating your own image is the way to go.
Set Up Your Blog
What we’re going to do is create an Image Map, which basically tells your readers’ browser which sections of the image are going to be linked and where.
To get started, install this Responsive Image Maps plugin. This plugin helps keep the links aligned to your photo no matter what size the user is viewing it on their browser (mobile, tablet, etc.).
Upload Your Image
Next, upload your image to your website and copy the full .jpg URL. To do this, simply upload your image like you normally would, go to to the Text editor as opposed to the Visual one, and then find where your image is. Copy the .jpg URL as seen here:

Once you’ve got the URL copied, head on over to this website: image-map.net
From here, select “Load Image from Website” and paste the URL from your image.
Create Your Hotspots
On the next page, you’ll be asked to draw boxes around the areas where you’d like to link. Click on the top left area of your first link. Then click on the bottom right spot where the box will end. A box should appear connecting the two dots. You can easily click and drag the dots to adjust them.
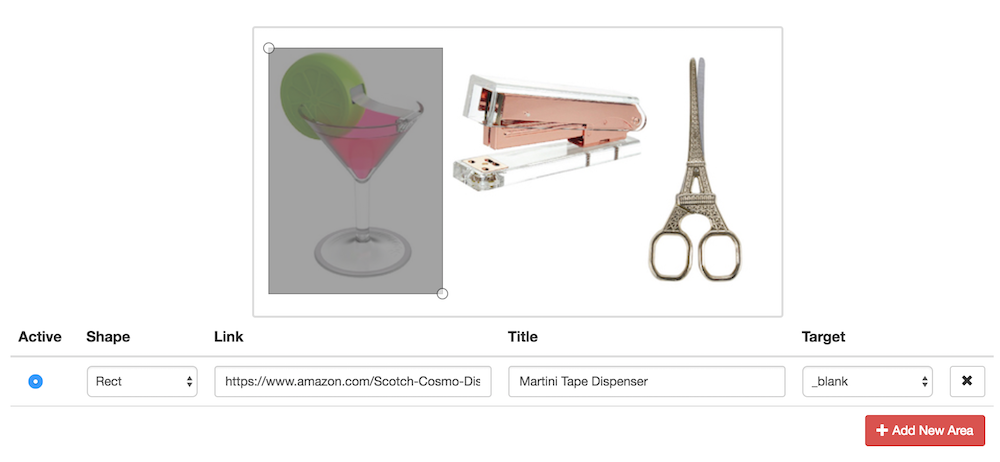
At the bottom of the page, you’ll see the option to add a title and a link to the box you just drew. This is where you can add your affiliate URL and give your link a title to remember later on if you like.
You can repeat this as many times as you need by clicking “Add New Area.” Make sure the little circle to the left of the line under the “Active” column is selected as you are drawing your boxes.
Grab the Code
When you’re done, click “Generate Code” and copy the text in that field. Go back to your WordPress post, make sure you’re in the Text editor (not the Visual one) and then paste the code. Be sure to delete the image code that is currently there otherwise your image will appear twice.
When you click “Preview” in your post, you should be able to see that the image appears with the links you set!
Pretty cool, right? Now you know it’s possible to create an image configured with multiple hyperlinks on the web!
Hi there! Thank you for this informative post! Do you know if there’s a way to integrate this method with an email signature and multiple areas for different links? I tried the method you described with creating an html image and pasting it onto the signature body, but none of the clickable elements work. Thank you so much for any advice!!
Hey Cecilia, I don’t know of a way, and honestly I wouldn’t recommend it because there are dozens of different email clients, each of which displays content differently. You’re better off creating individual image links for emails in my opinion!
I appreciate your response! Thank you for getting back to me so quickly. Take care.
Hi! Every time I try and copy the code it adds a
before the code which I can’t seem to remove. It has the effect of making the image non clickable. Any suggestions?
This was exactly the information I needed and it worked perfectly! Thank you for the post!
Looks like this plugin has not been updated in quite a while and is no longer working with WP. Is there a new alternative you would recommend?
Ditto on ^James’ comment & question. It’s all wonky once implemented.
Thanks so much for explaining how to add clickable areas to an image. This is just what I was looking for and couldn’t find it anywhere; plenty of how to’s if using photoshop, but I don’t have that and wanted to use html code like the rest of my page. I knew there was a way. Thanks again.
FYI: This method works great if you’re only using it at one viewport width. Once the image shrinks down to any width (from desktop down to tablet or smartphone for example), the button images (what I targeting) become unclickable because they changed location outside of the mapped coordinates. The mapped coordinates (rectangles in my case) do not change size or location, in other words, they don’t track with the original intended part of the image originally targeted.
I just noticed the Responsive plugin. Disregard what I mentioned above. I was too impatient to get something working fast and didn’t read the whole post! I’ll try that plugin. Thanks.
Responsive Image Maps
By Philip Newcomer
“This plugin hasn’t been tested with the latest 3 major releases of WordPress. It may no longer be maintained or supported and may have compatibility issues when used with more recent versions of WordPress.”
Get this WP plugin: Draw Attention By N Squared. I’m using the free version. Works with current WP as of 7/15/21. Continually updated and it does all the responsive image mapping you need. It’s amazing!
Hi! Thanks for this info, it’s so helpful! Do you know how to add multiple images with multiple image maps to one blog post? I’ve created three shopping collage images with links through the image map generator website, but when I publish my WordPress blog only one of the image maps seems to be attached to all three images even though I can see all three images with the specific image map coding on the backside of WordPress that I added through the blog text section. Any idea what I need to do differently to be able to view all three images with the correct corresponding image maps on the published blog post? Thanks in advance!
I figured out the solution to my question. Hope this is helpful to someone!
If you are adding multiple images with different image maps to the same blog post (I’m using WordPress), I fixed the image map issue by changing the names of the second and third image maps. Using image-map.net, the code created automatically sets to “image-map,” which is fine if you are only using one image in your blog post, but an issue if you are using multiple images and image maps. Which results in all images uploading to the published blog post but the first image map was the only map that loaded on all three of my images even though on the backside of the WordPress blog post I could see the images had their own specific image map attached.
It took me forever to figure this out but only seconds to correct the issue. Just make sure each image map has a specific name in the given code that correlates with each image.
See a picture of my correct coding example here: https://drive.google.com/file/d/1RIv5BYU_VMlIQWHE1Y-TQxKPfO8tcLa_/view?usp=sharing
Now it knows that each image map is different, and it understands to load each map to the specific image. I changed them to “image-map-2” and “image-map-3” from just “image-map”.
So if you’re going to add multiple images and image maps to one blog post be sure to replace the given image map code, and make sure you’ve specified that each of the maps are different.
Thank you very much for this! – This is exactly what I was looking for- very easy to follow guide!
Can i use this method on Pinterest with multiple link on one pin ?
Yes but only links to products and you can’t select them on the Pin image.