So you want to create a staging site for your WordPress blog? Awesome! Staging sites are useful for testing any changes to your website before pushing them live. Updating WordPress, changing your theme, updating plugins, adjusting your CSS, and removing old plugins can all potentially cause havoc on your website, resulting in down time. If you rely on your blog for money, having your blog down while you sort out the issue is never a good thing! That’s why I typically create a staging site to test any major changes to my site beforehand.
Today, I’ll walk you through how to create a staging site from a shared hosting plan. You’ll need access to your cPanel to get started!
1. Create a Subdomain
First, create a Subdomain within your hosting account from the Subdomains section in cPanel.
I opted to name mine: staging.myblog.com
1. Copy Your Website Files
Next, head back to the cPanel, and navigate to File Manager
Find the folder where your website is hosted. This could be “public_html” if it’s the first site you hosted on the host, or it could be titled “website.com” if it’s one of the later ones you hosted.
Select the folder, select one of the contents and then click Select All
From the top menu, click Copy
Enter /staging.myblog.com like so:

Click Copy Files
Now scroll to the folder “staging.myblog.com” where you just copied your website files.
Nice job! We’ve just copied the website files themselves, and now we need to copy the database as well.
Leave this tab open, because you’ll be coming back to it!
3. Copy Your Database
Go back into your Cpanel and click the option called phpMyAdmin under the DATABASES section
Find the database holding your website. If you only have one website stored, there should be just one!
Click the database name.
From the top menu, choose Operations
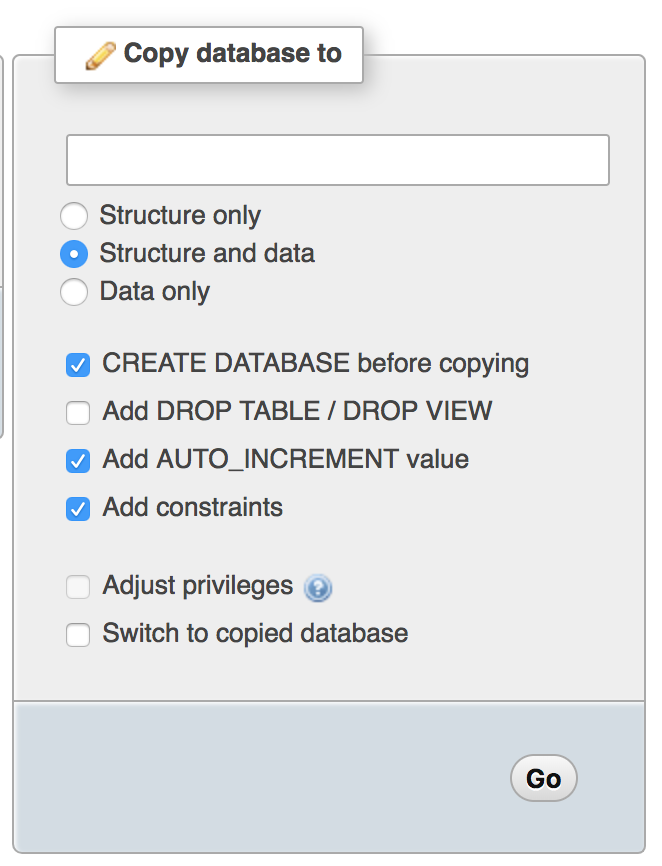
On the right, you’ll see a section called “Copy database to”
Pick a name for your database, make sure “Structure and data” is selected, and click GO
Remember the name of the database you just created!
The database may be open for you already, but if it is not, then click its name to open it. A bunch of lines which start with wp_ will open. Scroll down until you see the one that looks like this:
wp_abcd1234_options
The “options” part is what you’re looking for in case your database is structured differently.
Click this options table.
Sort by option_id if it is not already, and find option id 1, called “siteurl”
We want to edit the option_value column by double clicking it, and replace the text with our new staging site: http://staging.myblog.com
Clicking out of this box should save the new value.
Go to the next page and find option_id 33 titled “home”
Edit the option_value again and replace the text with the new site the same way: http://staging.myblog.com
4. Add a User to Your New Database
Go back into your cPanel and click into MySQL Databases under the DATABASES section.
Scroll down to MySQL Users
Add a new user by creating a username and password. Make sure “ALL PRIVILEGES” is selected when creating the user.
Once the user has been added, use it in the following section “Add User to Database”
Make sure you add the user you just created to the database you created just before.
Be sure to remember the database, username and password.
5. Edit Your WP-Config File
Go back into the File Manager in the previous tab you left open, where you should have your folder “staging.myblog.com” still selected.
Scroll down until you see a file called wp-config.php
Right click on this file and choose Edit. Alternatively, you can click this file once, and then choose “Edit” from the top menu bar.
Once this file opens up, scroll down to the MySQL settings section where you need to replace the existing text with the database, username and password you just created:
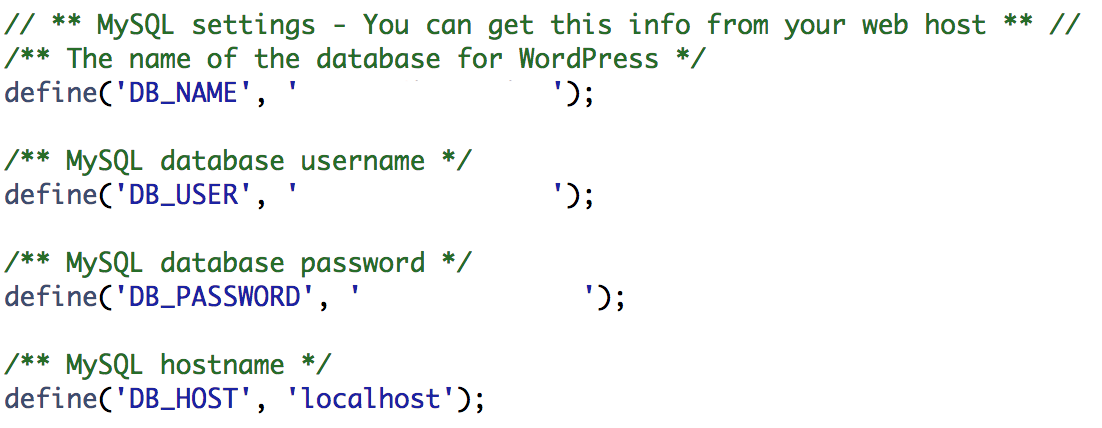
Be sure to enter the name, user and password exactly as they appeared when you created them, with no spaces before or after the apostrophes like so: ‘database’
Click Save Changes from the top, and then Close the file.
Congrats! You just created a usable copy of your WordPress website. Visit staging.myblog.com/wp-admin to log into your new Staging site. The username and password should be the same as what you use to log into your website normally.
How have you made use of a staging website?
This is such a great comprehensive guide to creating a staging site! I have since become more comfortable going into File Manager and phpMyAdmin, but a while back I used a free plug-in called WP Staging to create a staging site for my blog. It’s a good option if you aren’t tech-savvy or worried about breaking your site lol!
Thanks for the tip, Coco! Yep, using phpMyAdmin is tricky at first, but once you get the hang of it, it’s super useful at times! 🙂
I followed the instructions. But I get the dreaded 404 error.
Oh no! I’d double check all the steps you took, and if you still can’t find the issue, then reach out to your host and ensure all is ok 🙂