If you’re looking for a free Pinterest scheduler, then you’ve come to the right place. I’m going to share multiple ways to schedule pins for FREE to your Pinterest account, so you can up your Pinterest marketing game.
Pinterest is a search engine with millions of daily users looking for the next best idea to improve their life in one way or another. If you’re a blogger, then there’s a good chance you can reach a new audience on Pinterest, if you know how to properly distribute your content!
Pinterest rewards users who are regularly active on the platform. It’s better to post once a day for a week, than 10 times in one day out of the week according to the Pinterest algorithm.
Scheduling your pins in advance ensures you remain active on the platform in Pinterest’s eyes!
I have outlined the detailed strategies I used to grow my Pinterest traffic into the thousands, and a big part of that strategy is using a paid Pinterest scheduler called Tailwind.
- Read how I use Tailwind to drive traffic here
- Schedule your first 100 pins for free using Tailwind here
While I love using Tailwind for my bigger websites and find it very affordable for what it does, I don’t use Tailwind for all my blogs. Tailwind is best for bloggers with large amounts of visual content that need to be distributed to 3 or more boards on a regular basis.
If you’re just getting started with Pinterest or if you publish a small amount of non-visual content each month, then you may not want to invest in a powerful tool like Tailwind just yet. In those cases, a free Pinterest scheduler may be a better option for you.
I actually use the first and second Pinterest scheduling methods of this post to schedule my pins for this very blog you’re reading simply because I don’t publish often enough to make paying for a Tailwind subscription worthwhile.
Schedule Pins for Free
Ok, let’s get started with how to schedule Pinterest pins for free. I’m going to share three different ways to schedule pins for free. Hopefully, you’ll find one of them suits your needs!
Don’t worry, all of these methods I share are completely free. No credit card is required and no trials are involved.
Later
You can schedule up to 30 pins for free each month using the Later scheduler. Later is an awesome social media scheduling tool that works with many different social media networks. They have a generous free plan for anyone who wants to schedule social media posts once a day on different networks. I think it’s a great and simple option for budget Pinterest scheduling!
Planoly
Planoly is another social media tool that began as an Instagram scheduling tool. They have since expanded to include Pinterest in their social media scheduling dashboard. Like Later, Planoly offers all users 30 uploads (posts) free per month. What that means is that you can upload and schedule 30 images per month.
It’s a small difference but Later app lets you upload as many images as you want and then choose the ones to schedule. It will only publish 30 of them per month according to what you pick.
Planoly will only allow you to upload 30 images each month to your media library. As long as you are organized, this is a good option!
Pinterest Native Scheduler
Many people are surprised to learn that Pinterest offers its own native scheduler directly on the Pinterest website! I love using Pinterest’s native scheduler and it’s very easy to manage once you schedule a few pins. You must have a Business account with Pinterest to use this feature.
Schedule with Pinterest
To get started, go to Pinterest.com and click “Create Pin” or click the red plus sign at the top right. Alternatively, you can go to pinterest.com/pin-builder directly.
At the bottom right, click “Publish at a later date”
You’ll notice that the “Save from site” button disappears. Unfortunately, Pinterest for some reason disabled that feature when scheduling, so you’ll have to manually upload the image you want to Pin in order to schedule it.
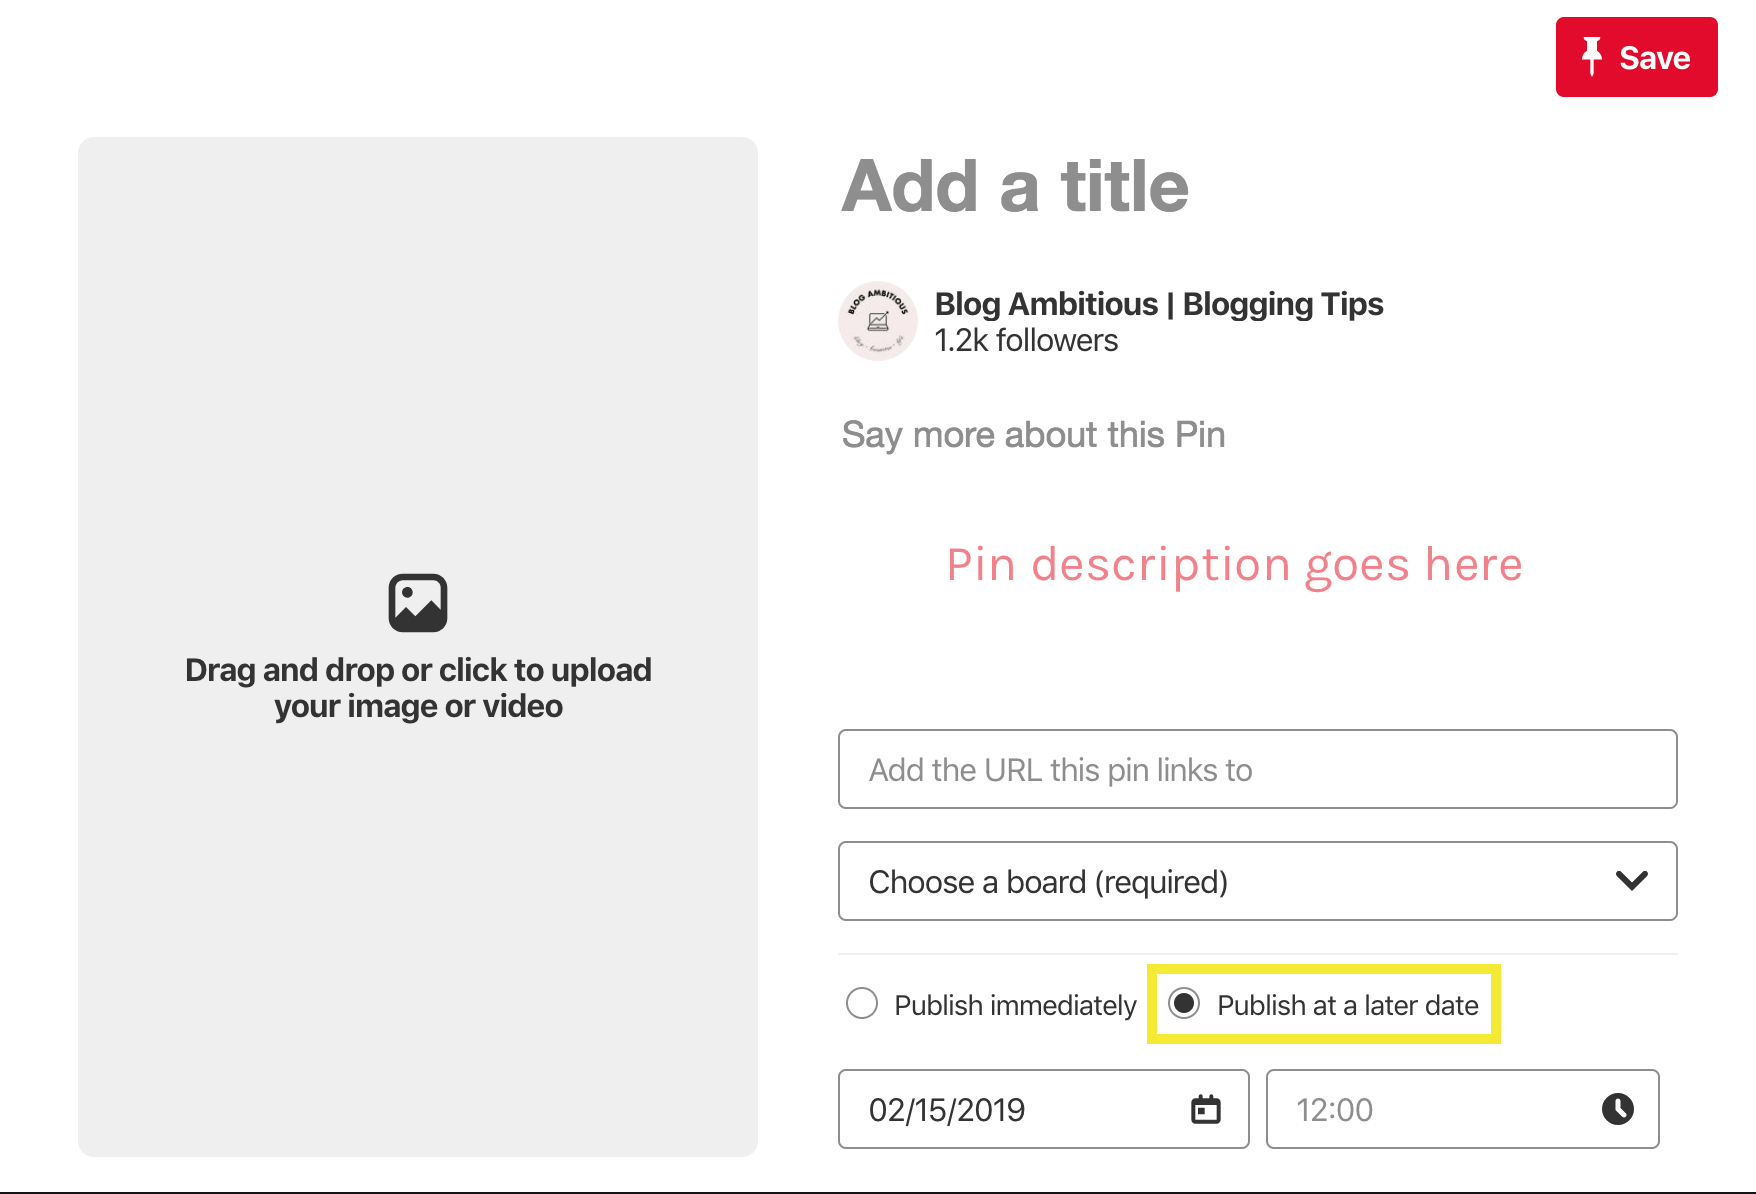
Go ahead and upload your image, create a title, write a description, and include the link to your blog post in the spaces provided.
Once your Pin is ready to go, choose the Board it will go to and select a date and time it will publish. Finally, click Save at the top right to schedule your Pin!
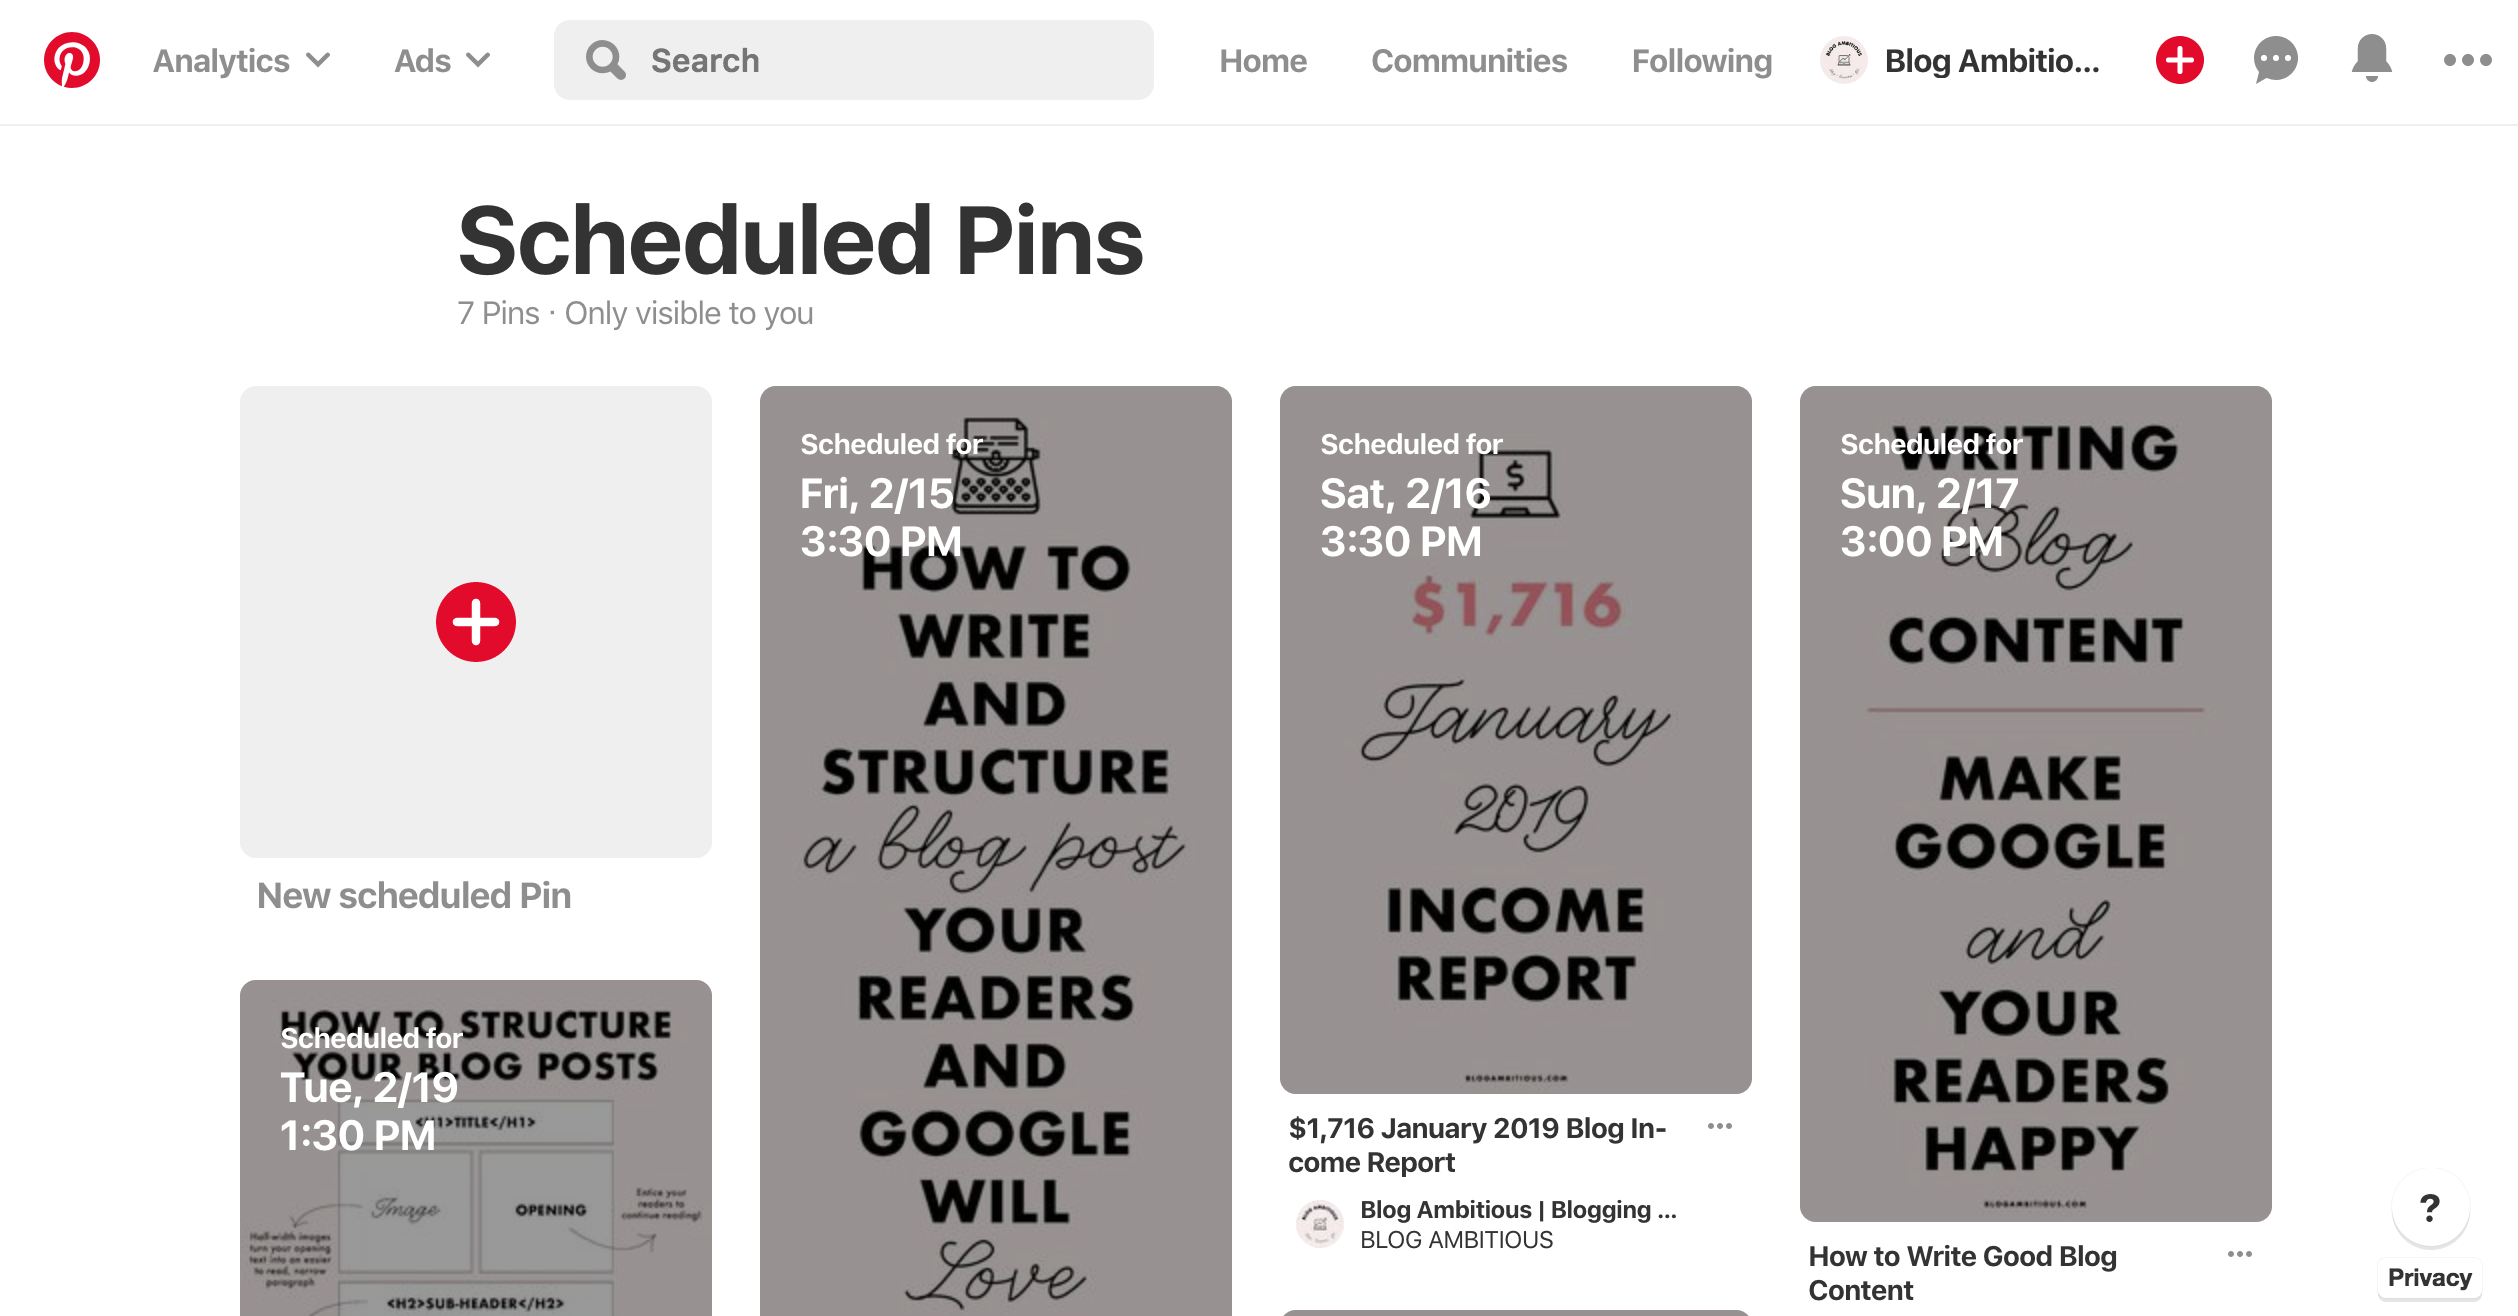
View your Scheduled Pins
To verify that your Pin has been scheduled, go to your Pinterest profile, click the “Pins” button, and look under the “Scheduled Pins” section.
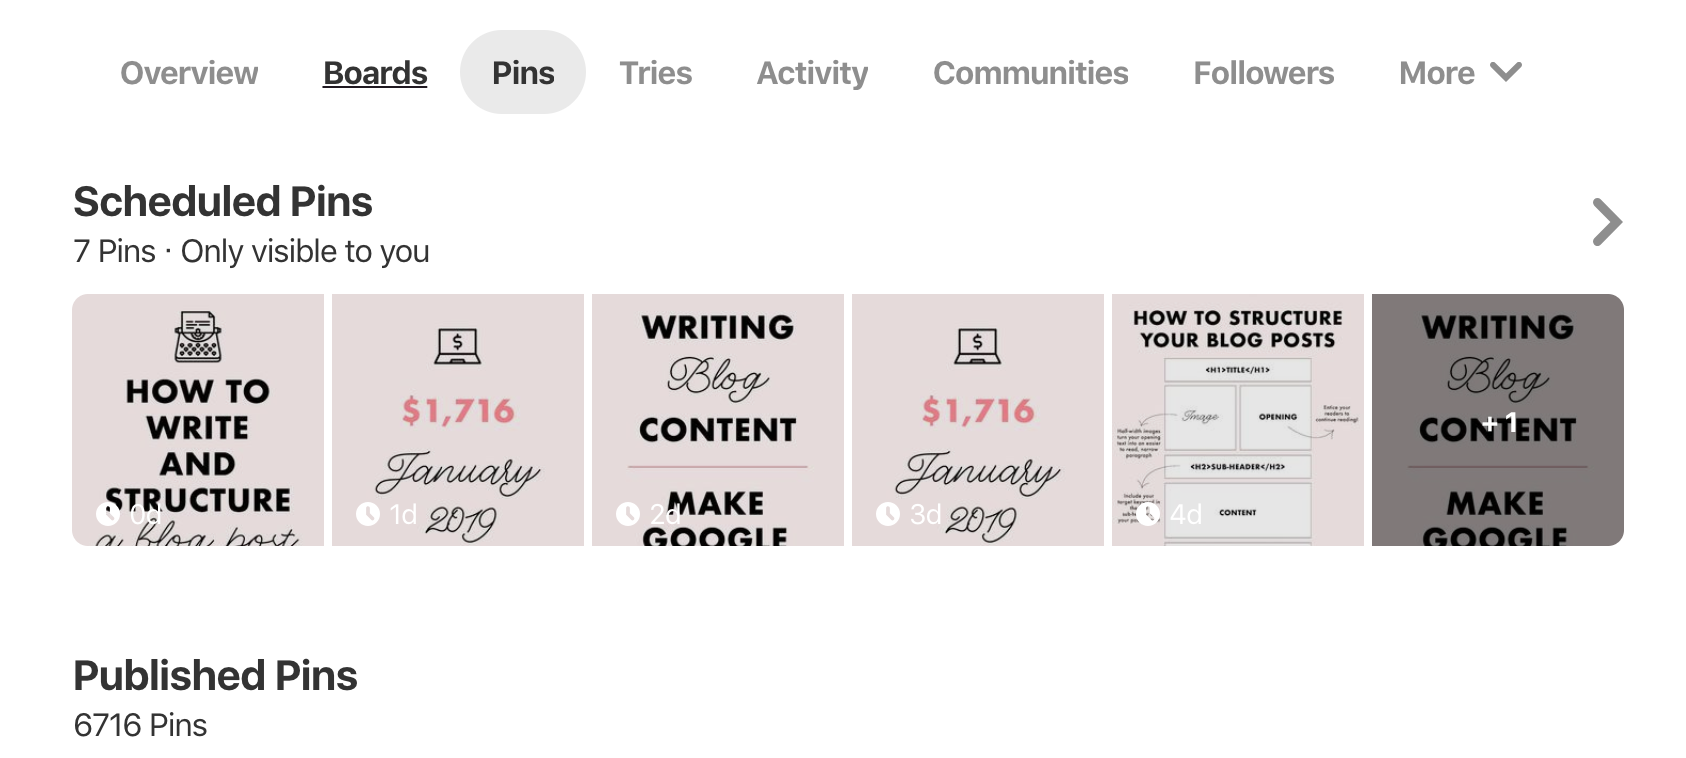
You can also go directly to https://www.pinterest.com/yourusername/scheduled-pins/
Drawbacks
There are a couple caveats to scheduling pins directly with Pinterest:
- You cannot edit pins once they are scheduled. You can only Delete the pins or Publish them immediately.
- You cannot schedule pins more than 2 weeks in advance.
- You cannot schedule more than 100 pins at once.
This Pinterest scheduling option is great for light Pinterest users who have a small amount of content to distribute each week.
IFTTT & Google Calendar
The second method offers a bit more flexibility than the native Pinterest scheduler and takes a calendar-based approach to schedule.
You should have basic knowledge of IFTTT and Google Calendar as well as know how to find an image URL. What we’re going to do is create an IFTTT applet that pins one image to one board at a specific time, depending on a Google Calendar event.
As far as I can tell, IFTTT allows you to create an unlimited number of applets, so even though I’ll show you how to schedule one pin to one board using IFTTT, you can simply repeat the steps below to create applets for all of the different boards you may want to schedule your pins to.
This scheduling method is compatible with both personal and group Boards!
Create a New Applet
To get started, create a new IFTTT applet here: https://ifttt.com/create
Select “Google Calendar” as your first service.
Scroll down and click “Event from search starts”
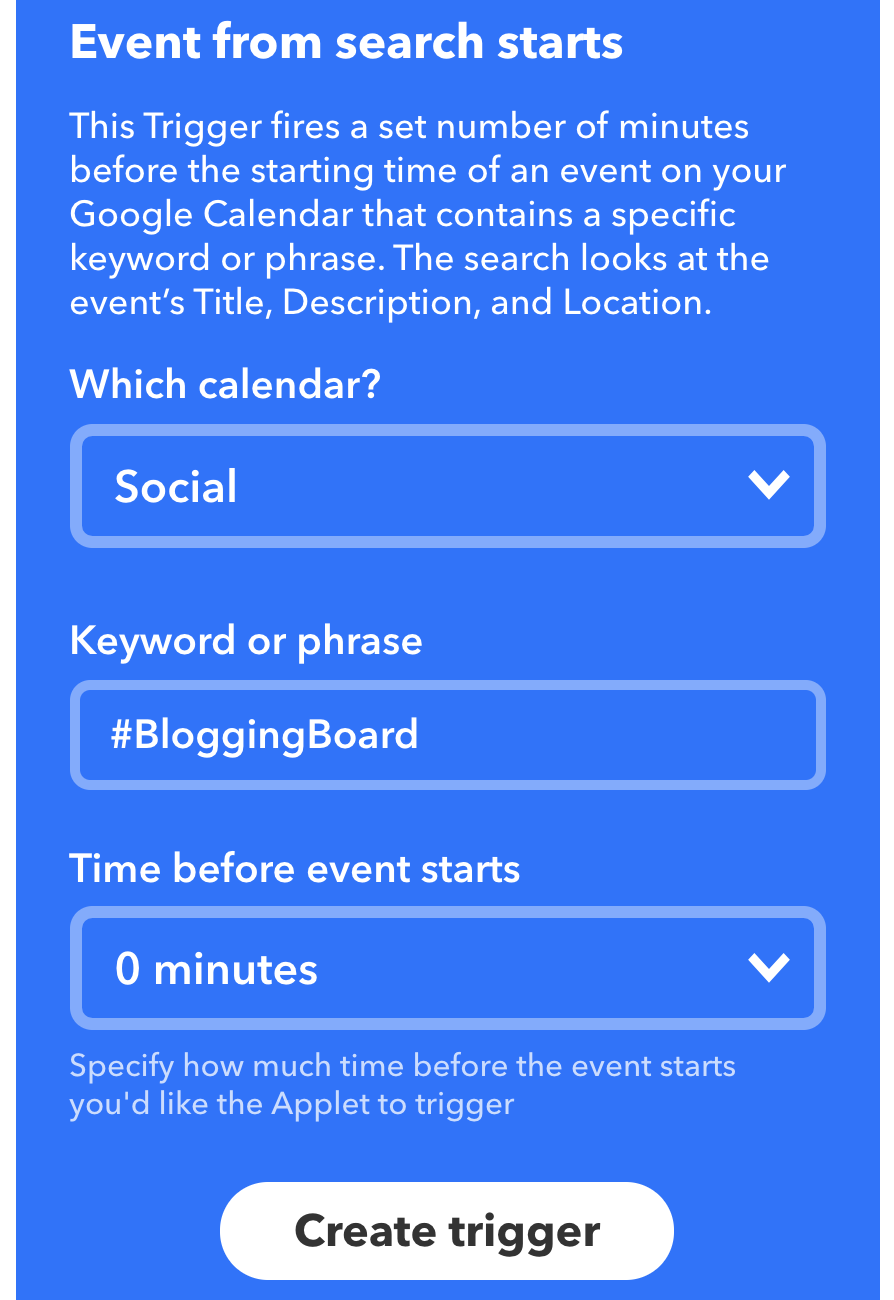
Select the calendar you wish to use to schedule your Pins. Personally, I made a brand new Google Calendar called “Social” to use for my scheduled pins. You’re welcome to use the default calendar if you prefer, though!
To create a new calendar, you simply click the small button with three dots in Google Calendar like so:

In the Keyword or phrase field, enter a somewhat unique hashtag that you are comfortable with appearing in your Pin Description. When you schedule a Pin on your Google calendar (I’ll walk you through this next) with this hashtag in the Pin Description, the image will automatically be pinned to a board on Pinterest.
There are a few ways you could go about choosing a hashtag:
- Use a board-based tag that is specific to one board like #BoardNameHere
- Use a topic-based tag like #Food that could trigger a pin for multiple food boards. You would still need to create several different applets corresponding to each Food board, but the good thing is that you would only need to create one calendar event for the pin to trigger posting.
Once you know your tag, click “Create Trigger” at the bottom.
Next, you want to select “Pinterest” as the next service.
Click the only option: “Add Pin to board”
In the field Enter a board name write the the name of the board you want to schedule pins to. IFTTT recognizes symbols, so it’s best to copy and paste the board name you’re scheduling to directly from Pinterest. This field must match the board name exactly, so copy and pasting from Pinterest is really the best option, especially if you’re working with group Boards where somebody else wrote the title.
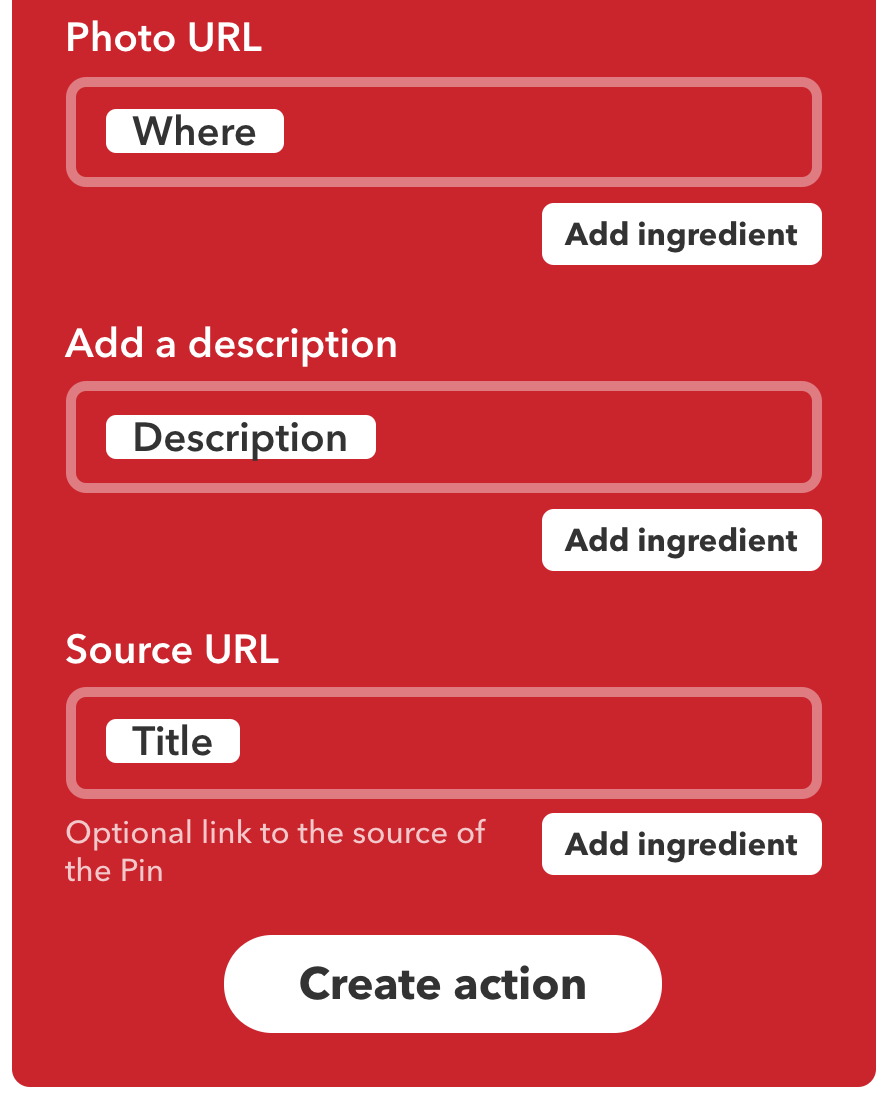
In the Photo URL field, click “Add Ingredient” and choose Where.
In the Add a description field, click “Add Ingredient” and choose Description.
In the Source URL field, click “Add Ingredient” and choose Title.
Here is how those last three fields should look:
Lastly, click “Create action.”
Now that your IFTTT applet is set up, it’s time to schedule your pins using Google Calendar!
Create a New Event
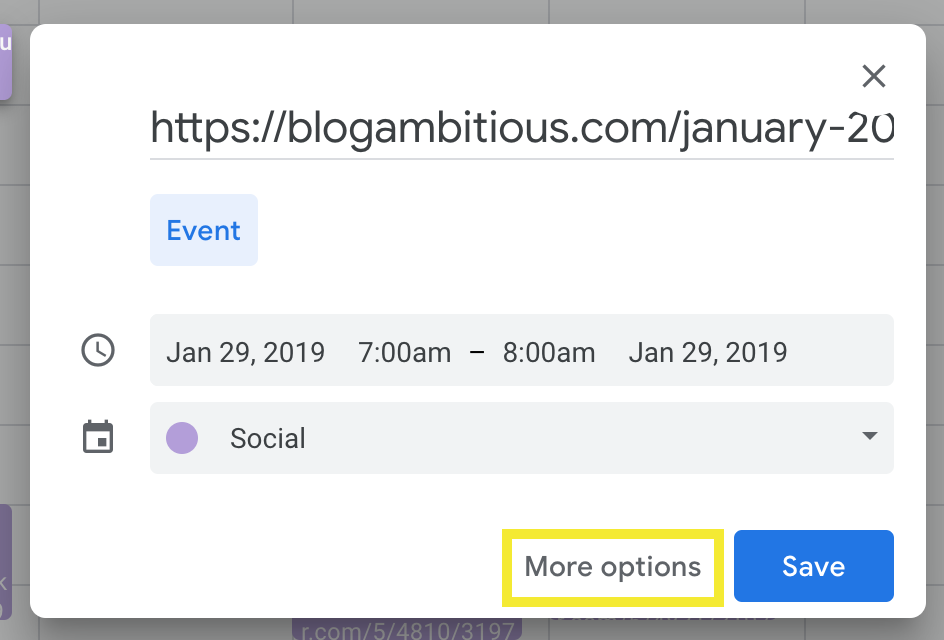
Go to Google Calendar and click a time slot on the calendar to create a new event. Choose the date and time in the future when you want the pin to be published.
Where it says “Add title,” paste in the URL of your blog post. You may need to change the Calendar of the event by clicking the dropdown beneath the date and time selection box if you opted to use a different calendar than the default one. Click “More Options” instead of the Save button to open up the Event editing page.
In the “Add Location” field, enter the URL of the image you want to pin to Pinterest. You can find this by going to your blog post, right-clicking the image, and choosing “Open Image in New Tab.” From there, grab the URL of the image, which should end in .jpg if you uploaded a JPG file.
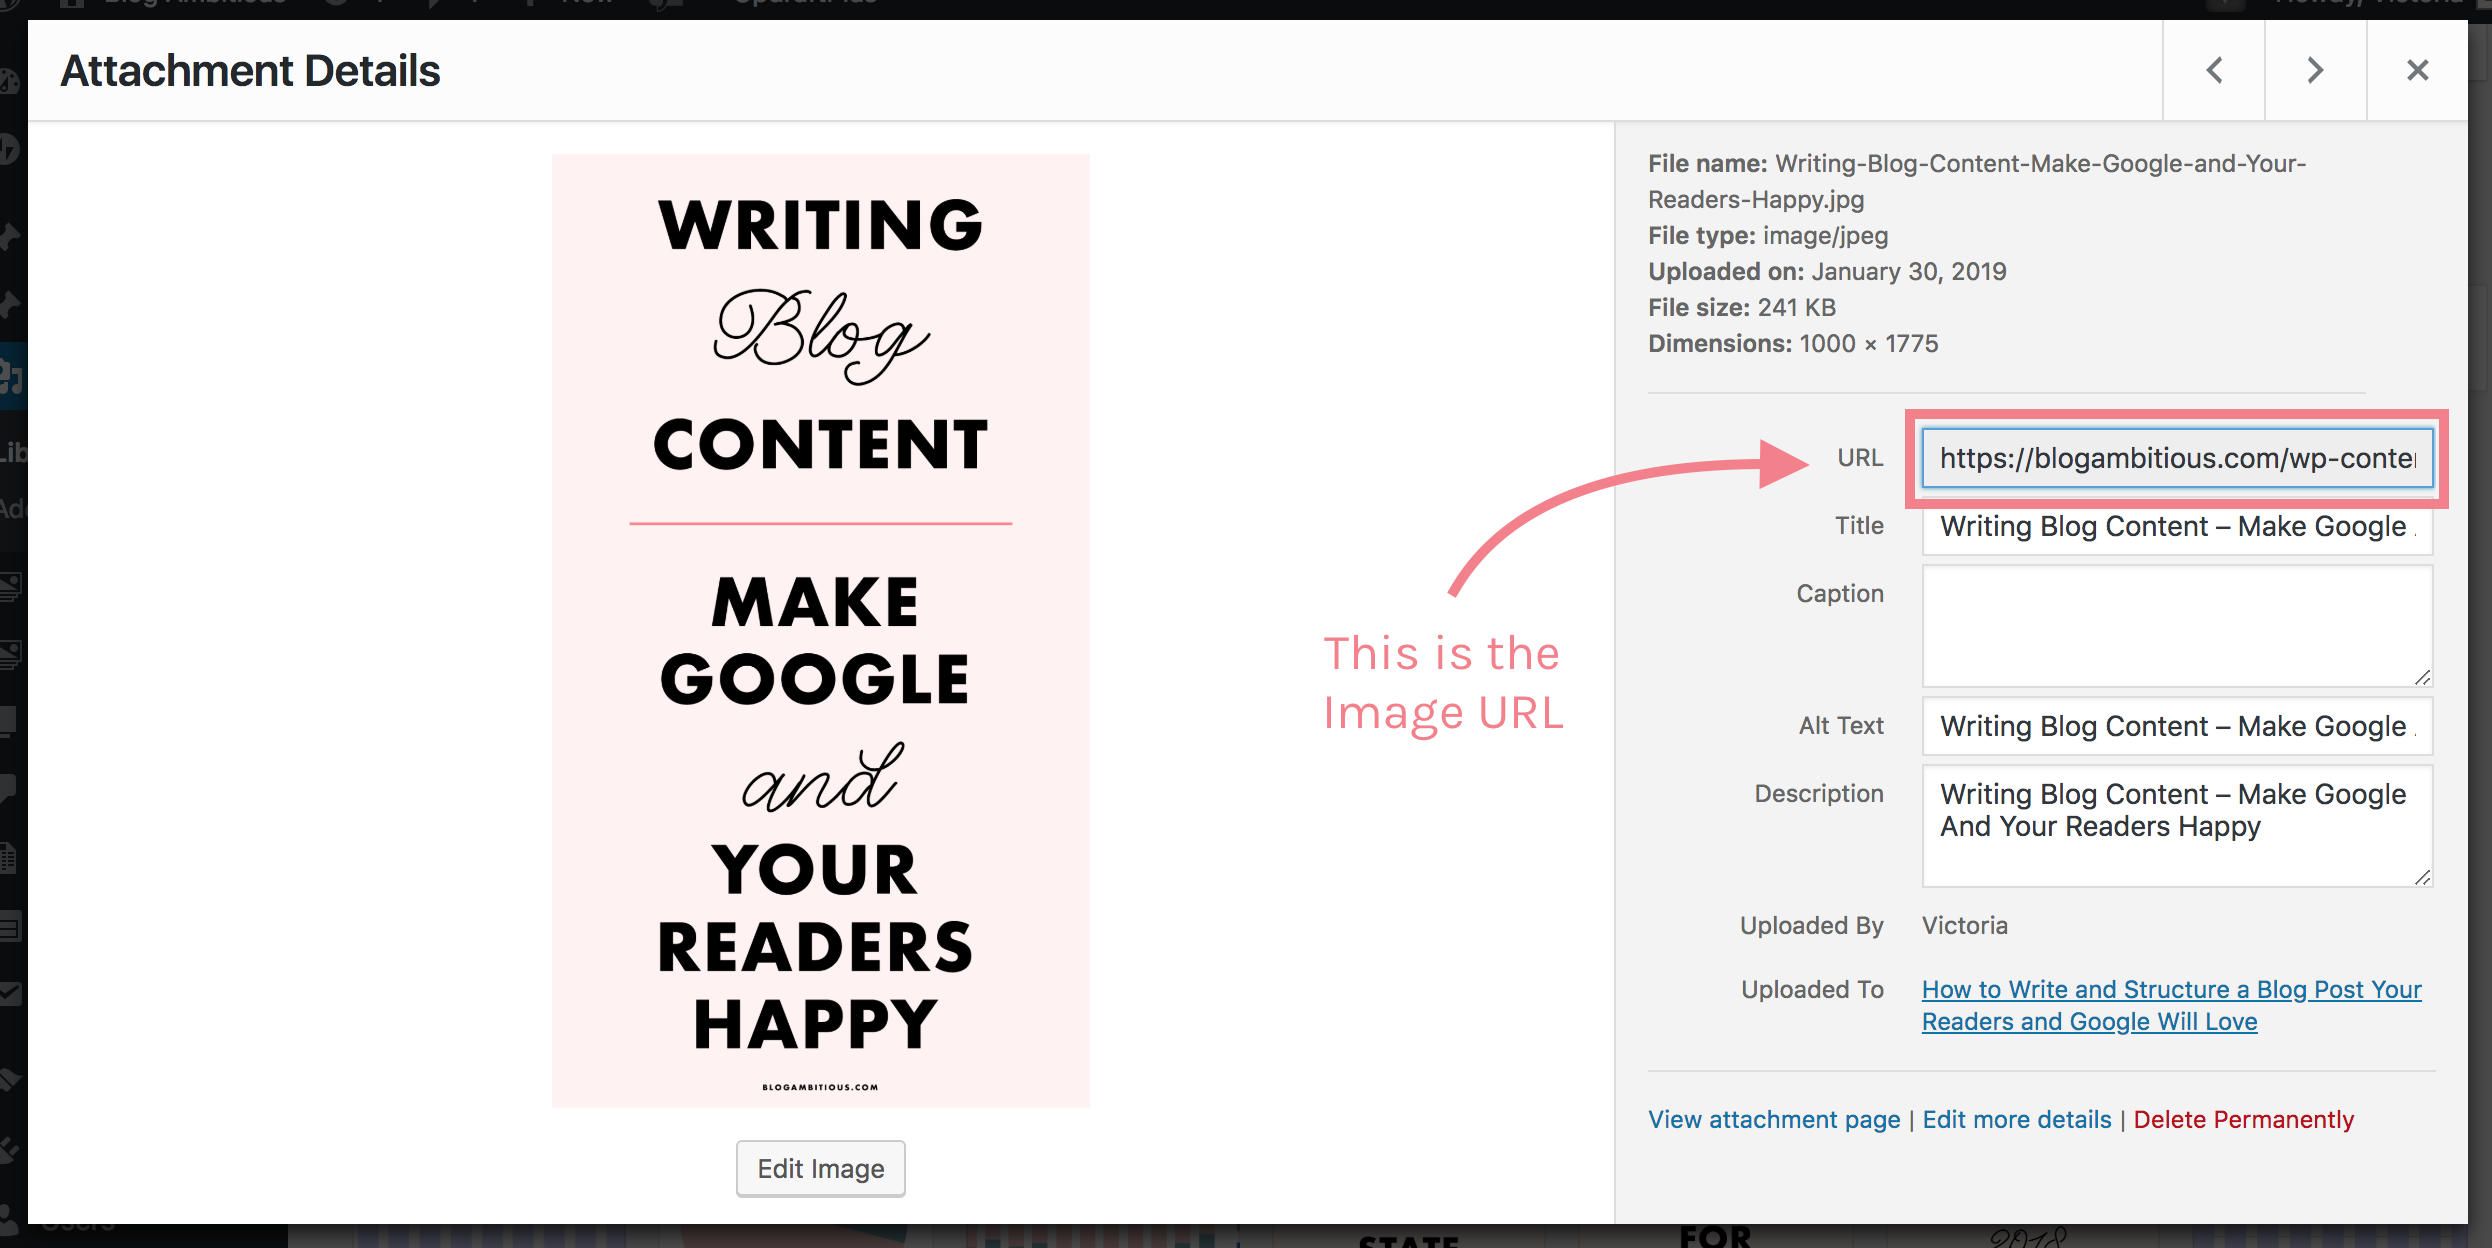
Alternatively, you can find this image URL by going to the Media section of your WordPress backend (yourblog.com/wp-admin/upload.php), clicking an image, and copying the value in the URL field of the pop up.
If the image you want to pin isn’t uploaded to your blog, then you may need to use a free service like Flickr to host your image on the internet and grab the Image URL from there. Flickr allows you to host your images privately, but still creates a publicly accessible Image URL you could use for this purpose.
In the “Add description” field, you should write a nice keyword-rich description for your Pin. The description is limited to 500 characters so you may want to draft this paragraph out in Pinterest itself before adding it to Google Calendar to ensure you don’t go above the limit.
Be sure to use the hashtag you specified earlier in your Pin description, so IFTTT knows to send the Pin out to Pinterest!

Click “Save” when you have filled out those fields.
That’s it! You’ve scheduled your first pin using IFTTT.
As mentioned, you can repeat the steps above to have IFTTT publish pins to all your other boards. You can also create new calendar events for each pin you want to schedule in the future!
Schedule Looping Pins for Free
What’s really cool about this method is that you can loop pins for free, too. All you have to do is use the event repeating functionality of Google Calendar events!
You can find the repeating option underneath the date and time section when editing your event. By default, the dropdown says “Does not repeat” but you can change this and repeat the event as often as you like.
However, I would not re-publish identical pins more than once a week at MOST, and the only pins I have that repeat are doing so about once a month!
Tread lightly – it’s not worth risking your account being flagged as spam.
Hootsuite
Another option for scheduling pins is using a social media scheduling tool called Hootsuite. Hootsuite is well known for its Twitter and Facebook scheduling capabilities, but the tool has recently expanded its offering to include Pinterest scheduling as well!
What’s awesome about scheduling with Hootsuite is that you can schedule to multiple boards at once. However, the reason why I have Hootsuite listed last is because it is prone to failures if you’re scheduling pins to more than 5 boards at once. You are also limited to just 5 posts per month which is quite low.
Here is how I recommend scheduling pins using Hootsuite:
Add your Pinterest account to your Hootsuite account here if you have not already.
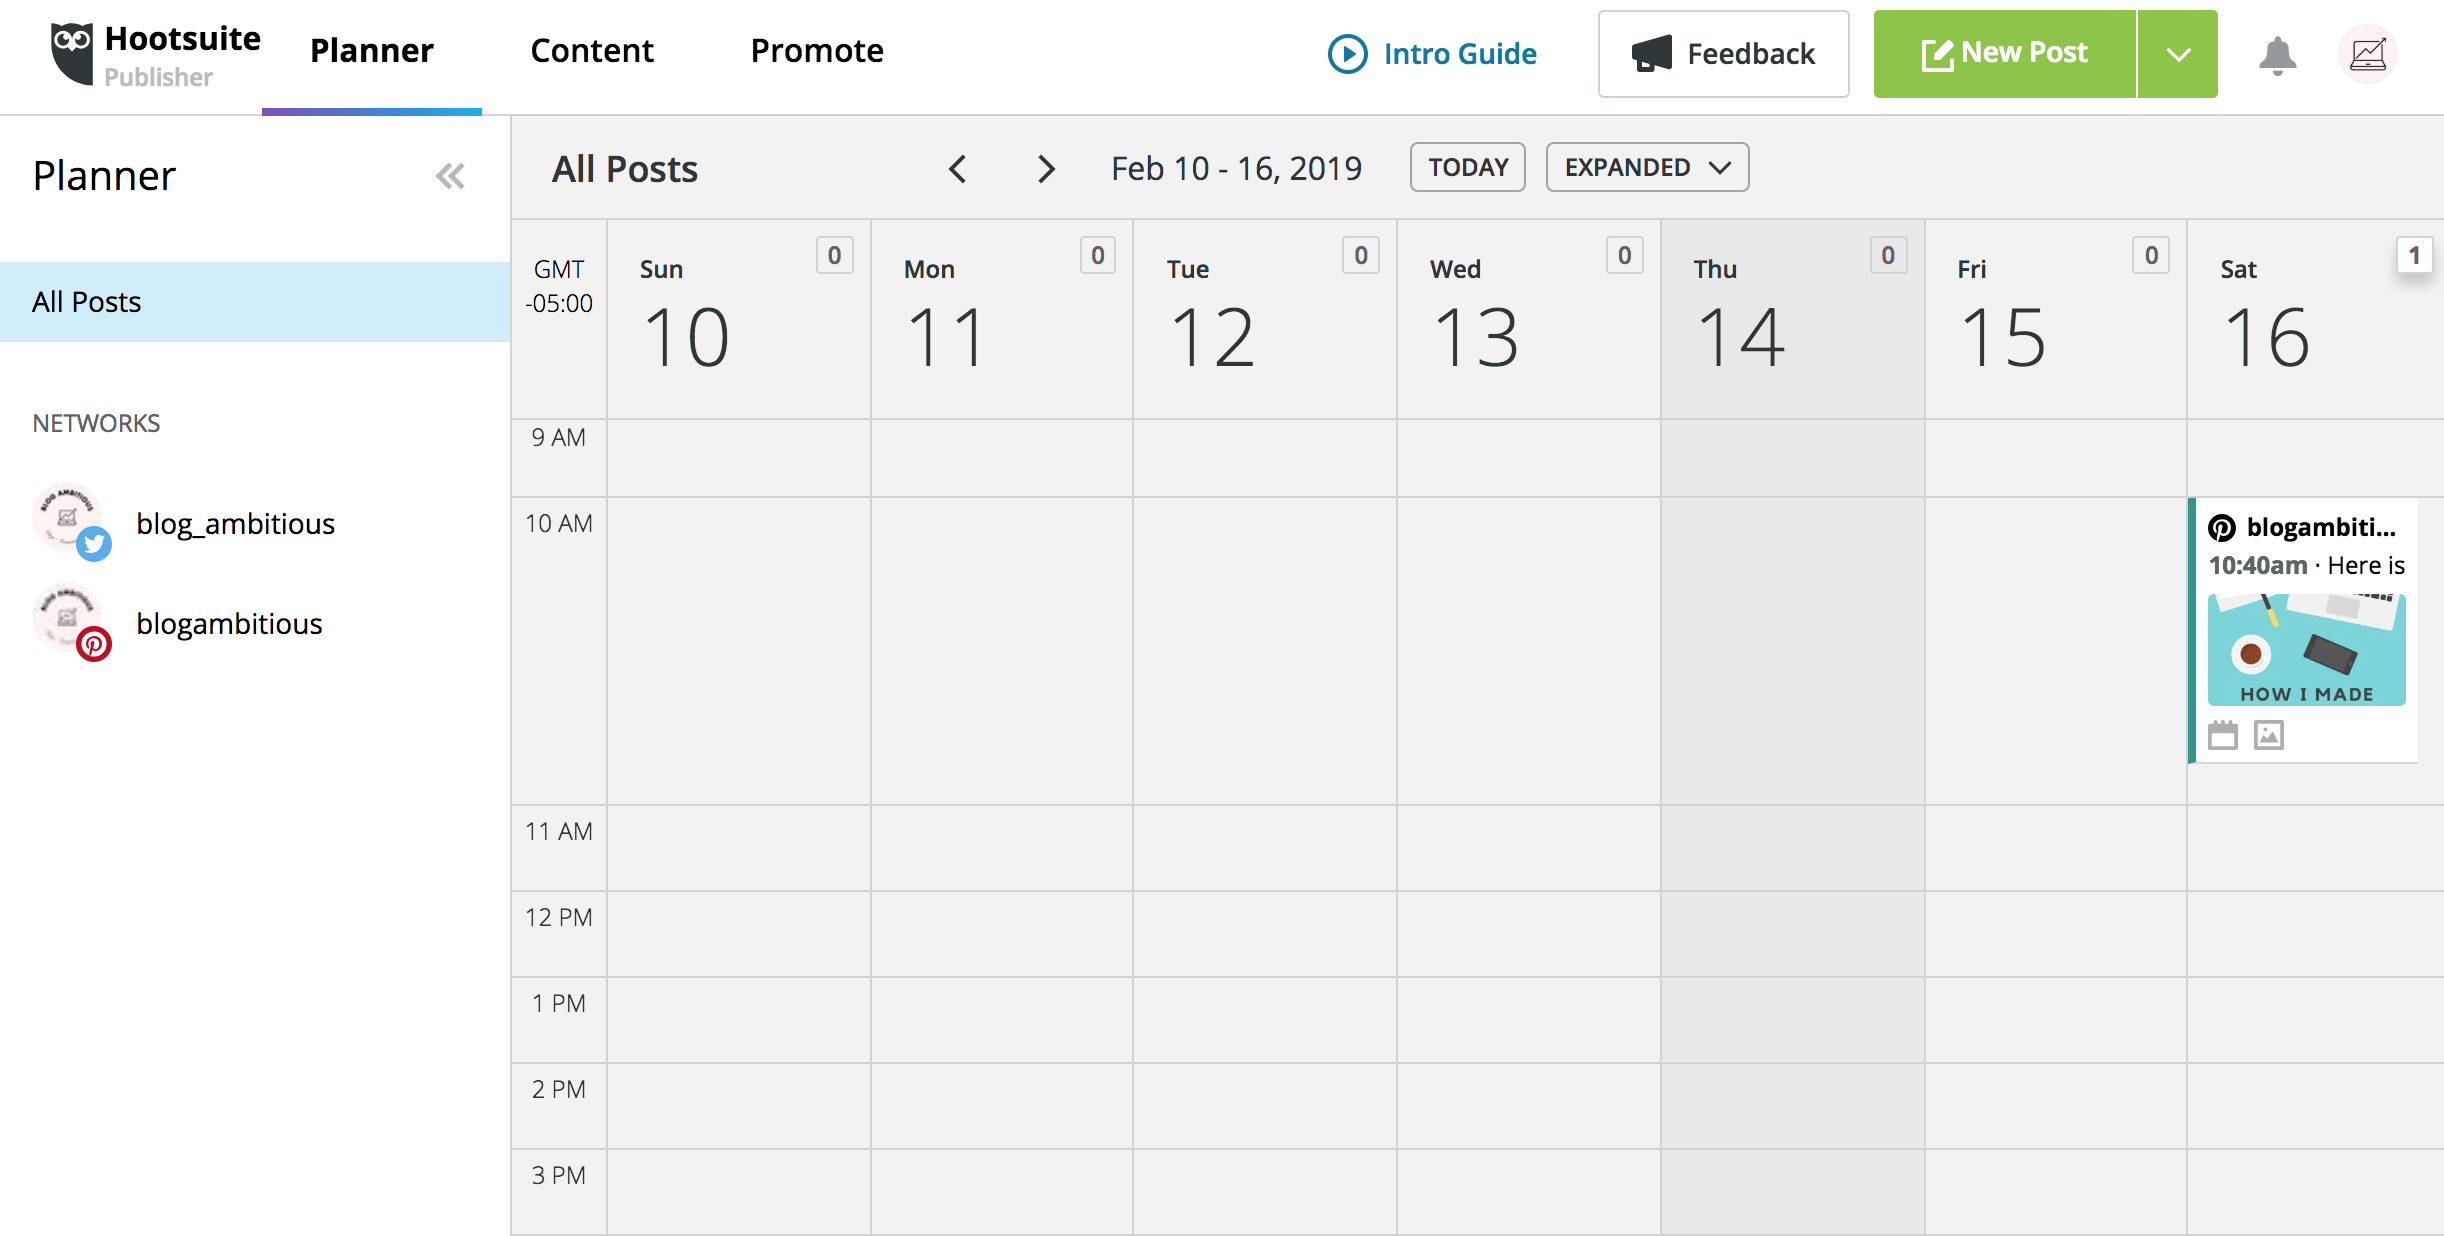
Next, click Publisher from the sidebar menu.
Click the arrow to the right of the big green “New Post” button at the top right. You’ll see a dropdown emerge. Click “New Pin.”
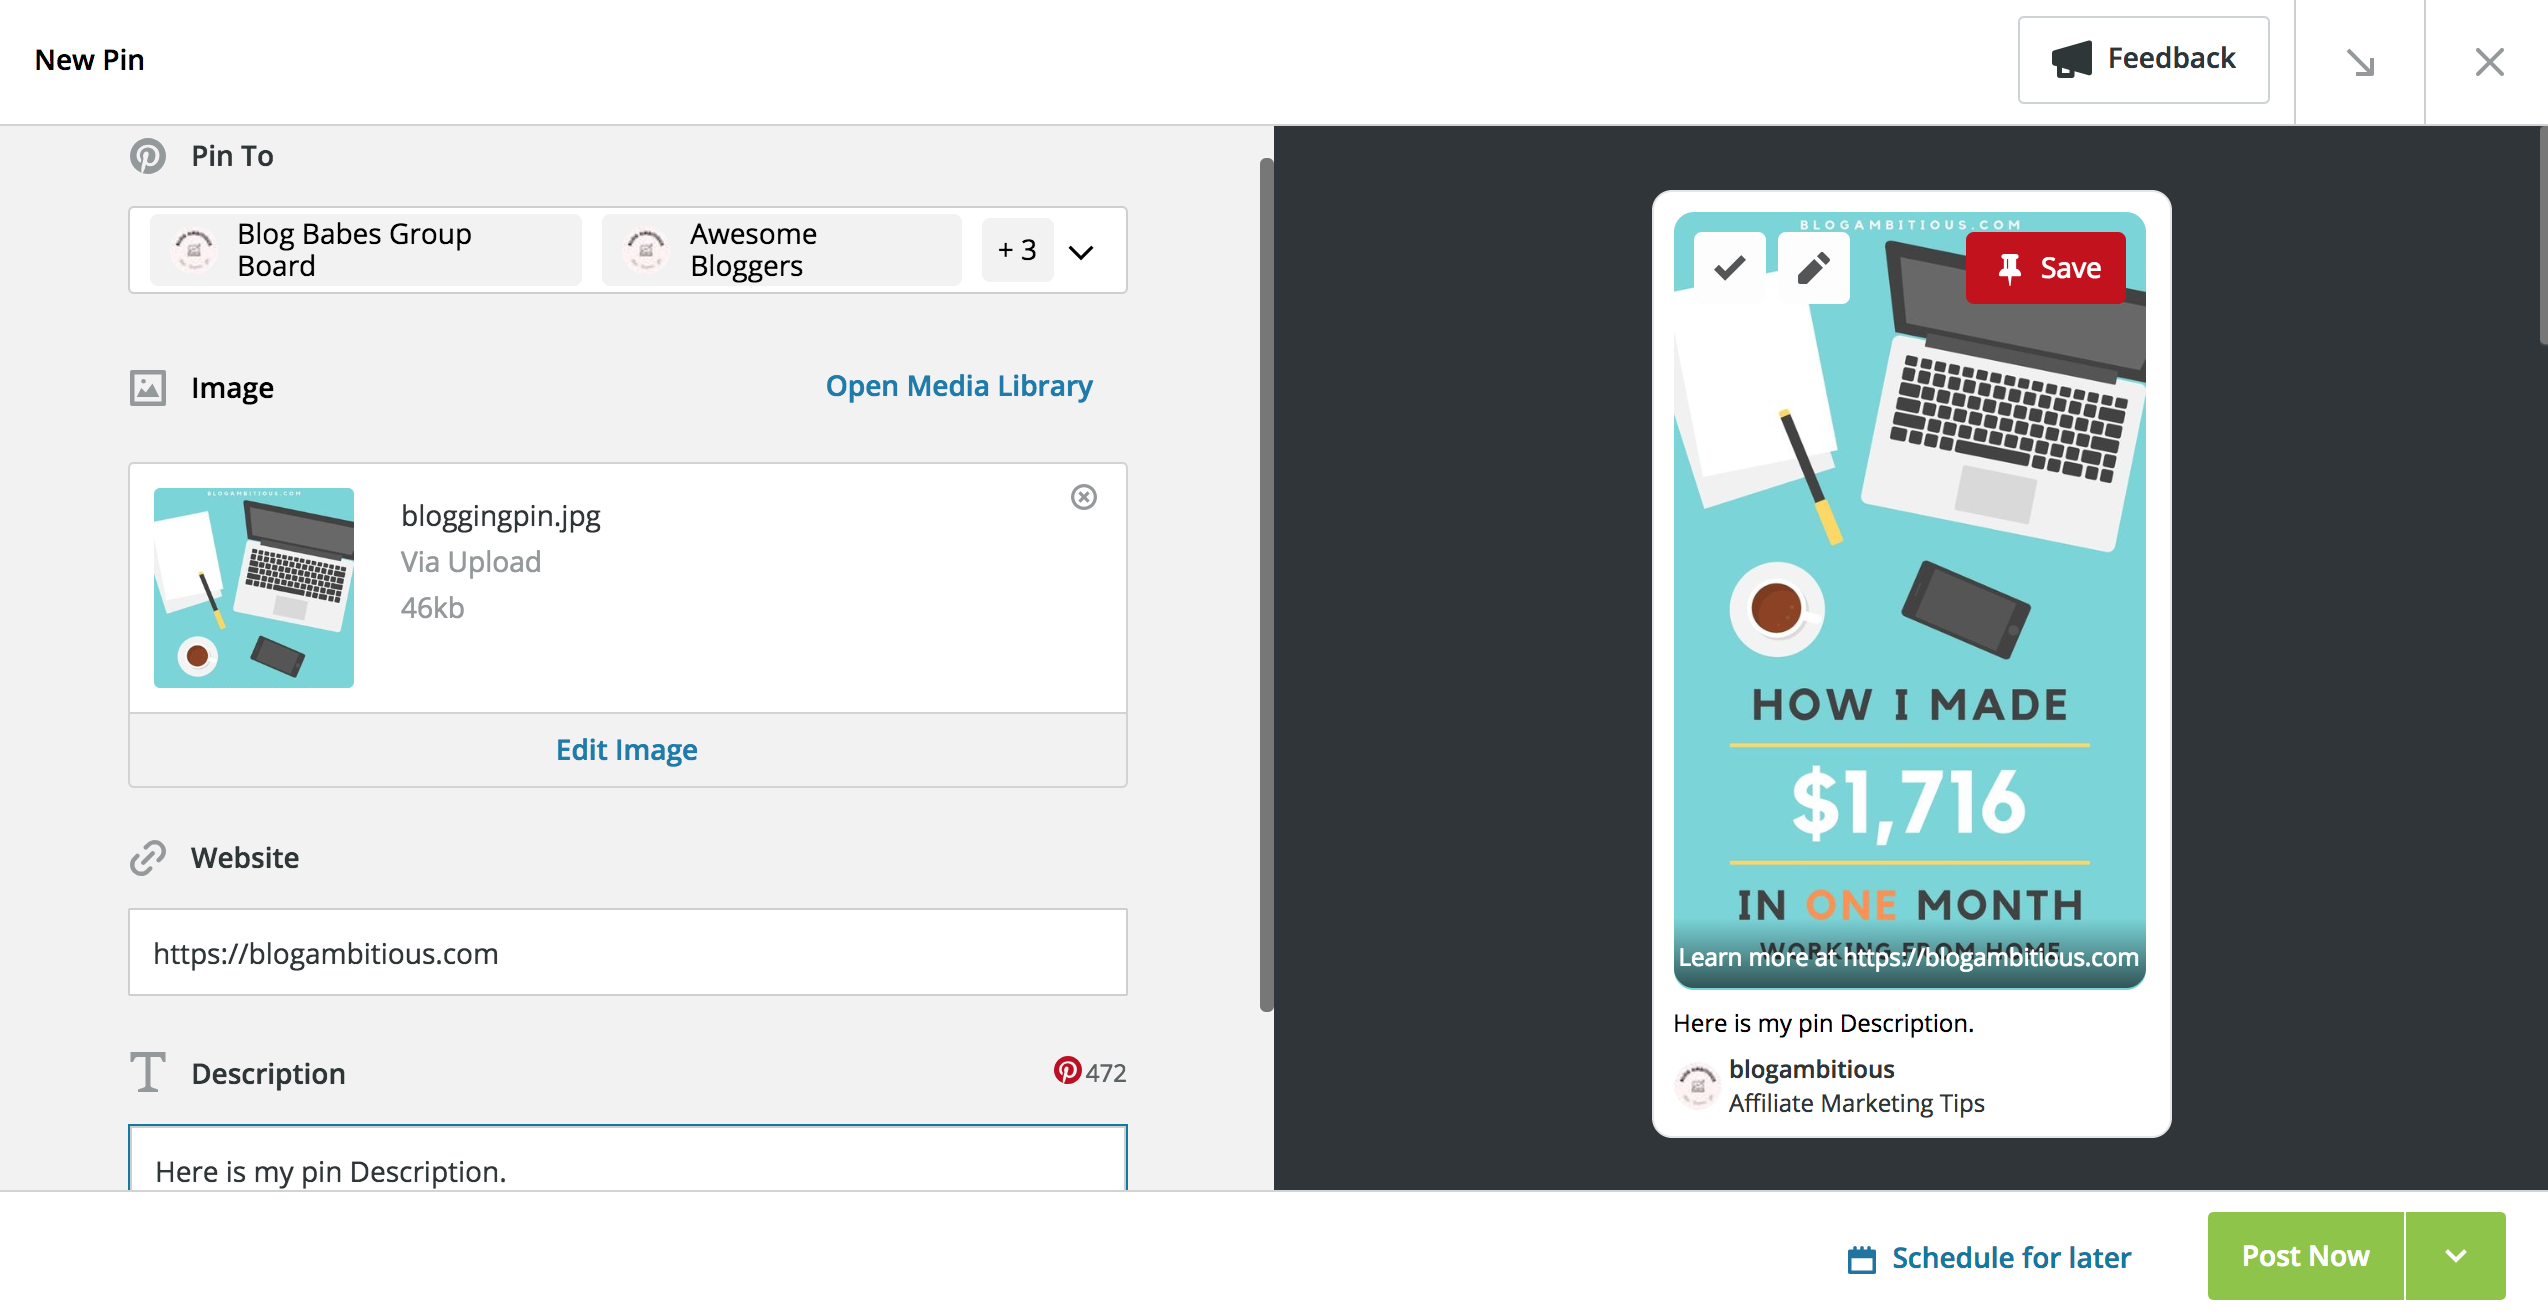
Select the boards you wish to pin your images to. I don’t recommend selecting more than 5 boards, but you can test it out and see how many your account can handle. I tried to schedule to like 20 boards at once a little while ago, and all but 8 or so of them failed!
Upload your image.
Add your blog post URL to the Website field.
Write a Description for your pin.
As you can see, Hootsuite actually gives you a preview of how your Pin will appear on Pinterest. This is helpful for making sure your text won’t be hidden behind the Save button!
Once your pin looks good, it’s time to schedule it by clicking “Schedule for later” on the bottom right.
Choose a date and time that suits you, click “Done,” and then finally “Schedule” to finish up. There is currently no way to set a time interval between the pins like you can in Tailwind, so the pins will be published all at once if multiple group boards are selected.
Your scheduled pins should appear on your Hootsuite calendar when you’re done to give you a visual representation of your Pinterest scheduling.
That’s how you schedule pins with Hootsuite!
Buffer
Lastly, social media scheduling giant Buffer has recently announced that they will finally begin offering free pins to all users! Previously, you had to have a paid plan to access the Pinterest scheduling feature. Now, users can have up to 10 pins scheduled at any time.
I use Buffer for scheduling some of my Facebook and Twitter posts, so I’m excited to try this new feature from the Buffer team!
I hope this article was useful in helping you schedule your Pinterest pins for free! I’m a huge fan of doing things for free when I can.
Here are a few more articles on how to do blogging-related things for free:
This is a great post! I had no idea there were free options! Thank you for sharing these!
Anytime! 🙂
Wow. Inspired. Can’t wait to make this! Thank you.
Pinterest’s native scheduler is very basic, but can be useful for those who’re just starting out with Pinterest. I find it useful to upload video pins because we can’t schedule video pins on Tailwind yet.
Thank you for doing this. Your work is so lovely and it’s really kind of you to share.
Omg THANK YOU! Pinning through Hootsuite is a game changer. I maxed out on my manual scheduling on Pinterest and don’t want to invest in Tailwind just yet so Hootsuite is perfect! Thanks for the tips 🙂
yukireads.com | book reviews & bookish content
You’re welcome!!
The IFTTT method hasn’t worked for several months as Pinterest put stop to it and IFTTT won’t let you connect any calendars to Pinterest. Hootesuite only allows 5 free posts now. About the only way to schedule for free is on Pinterest itself.
Hi Sharon! Sorry to hear that. Have you tried the Later app? They allow 30 posts per month for free.